Real-time Hair Creation Tips
Thanks to Valeria Zagami for her insightful tutorial. This concise guide offers various tips on real-time hair, providing a simple yet effective resource, especially for beginners. We’re excited to enhance this tutorial with upcoming breakdowns for curly hair and to keep offering more helpful tips.
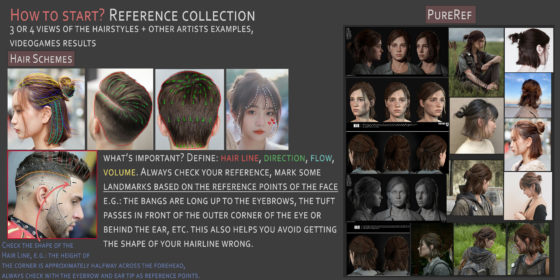
How to start? Reference collection
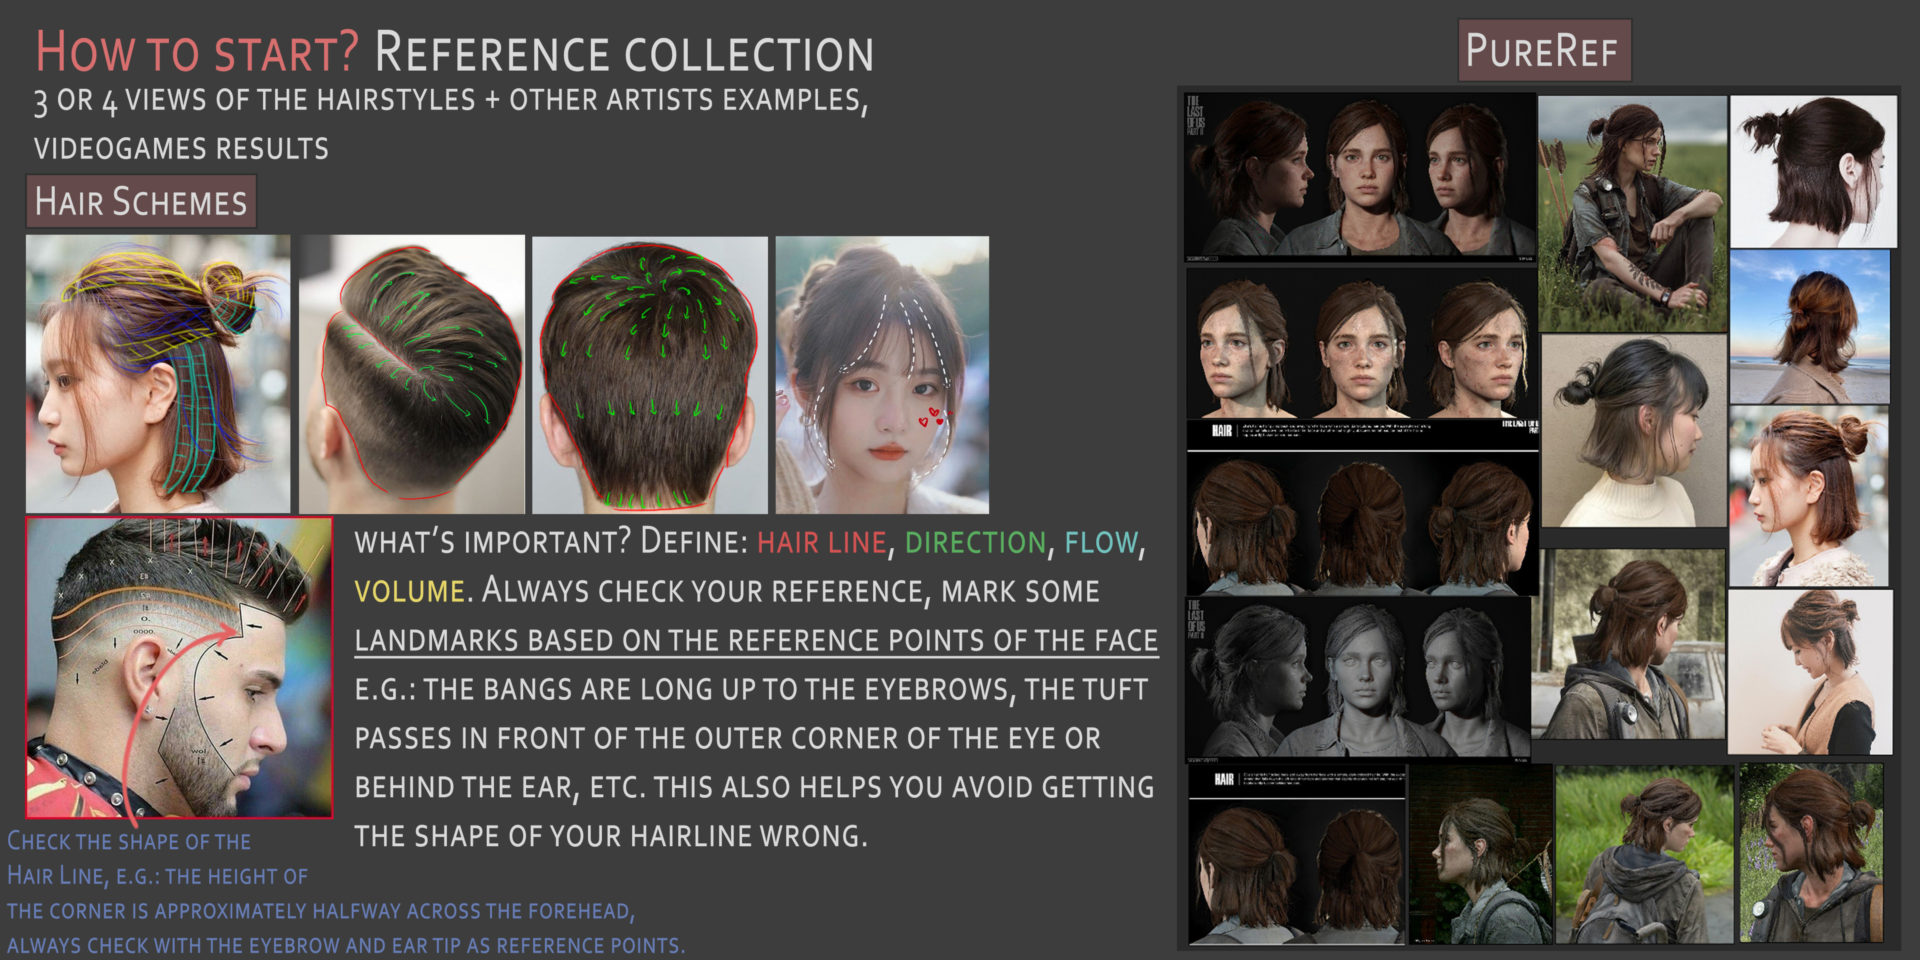
To get started on creating realistic hairstyles, begin by assembling a comprehensive reference collection. This should include three to four views of the hairstyle you want to create, along with examples from other artists and finished looks from video games.
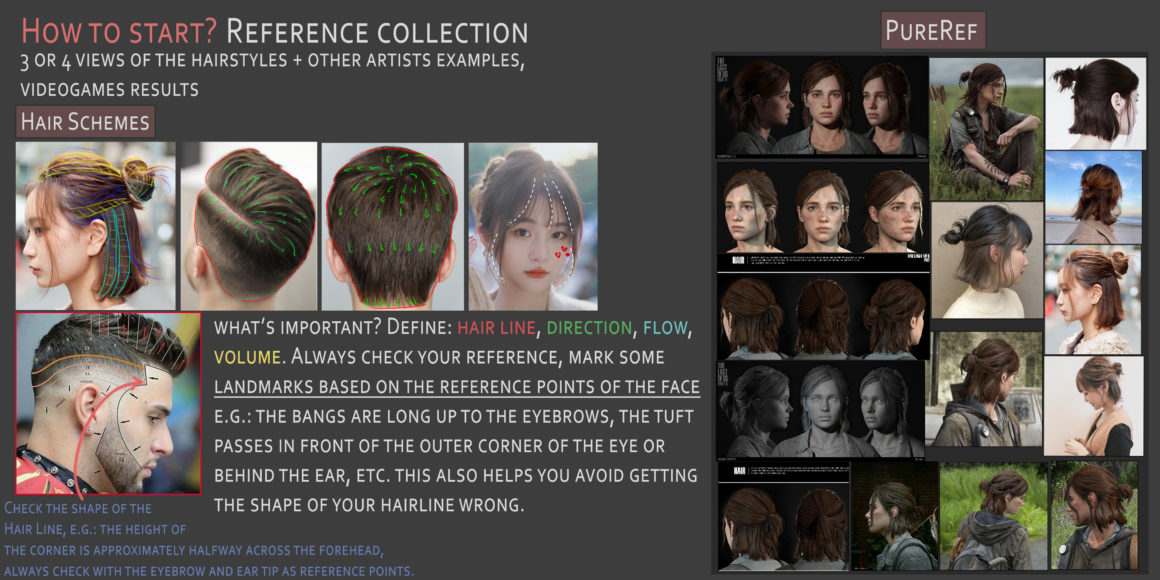
What’s Important?
- Define Key Elements: Focus on defining the hairline, direction, flow, and volume.
- Utilize References: Continually refer back to your reference images. Mark landmarks based on the reference points on the face to guide your styling. For instance:
- Note how long the bangs are, such as whether they reach the eyebrows.
- Determine if a tuft of hair falls in front of the outer corner of the eye or tucks behind the ear.
- This approach helps ensure the accuracy of your hairline’s shape.
Checking the Hairline Shape:
- Pay attention to the height of the corners of the hairline; they are typically about halfway across the forehead.
- Always use the eyebrows and the tips of the ears as reference points to check the alignment and proportions of the hairline.
Following these guidelines will help you create more accurate and realistic hairstyles in your digital art projects.
Blockout (Sculpt)
When creating hairstyles, particularly in 3D modeling, it’s crucial to start with a simple blockout. Here’s how to approach it effectively:

Initial Blockout:
- Keep It Simple: Often, a basic blockout is sufficient. Avoid spending too much time on this phase. It serves primarily as a reference and helps you grasp the flow and volume of the hair.
For Stylized Hair:
- Refined Sculpting: When creating stylized hair, opt for a more defined sculpt. This allows you to extract hair cards from individually sculpted locks.
Two Methods to Create Hair Cards:
- Clean Geometry and Polygroups:
- Start with low subdivision levels. To create hair cards, select the upper faces from distinct polygroups. This method is straightforward and helps maintain clean geometry.
- Curve Techniques:
- Begin by selecting edges along the hair lock.
- Use the “Edges to Curve” feature to transform these edges into curves.
- Next, select “Curve Card” and open the “Curve Control Window.” This panel lets you adjust settings such as Orientation, Width, and Profile to fine-tune the appearance of the hair cards.
Both methods provide distinct advantages and can be chosen based on the specific needs of your project or personal preference for workflow. Using these techniques, you can efficiently create realistic or stylized hair for your 3D characters.
Texture
When creating hair textures for 3D models, starting with a solid foundation and using the right tools can make a significant difference. Here’s a step-by-step approach to developing hair textures effectively:

Initial Texture Blockout in Photoshop:
- Draft the Textures: Begin by drawing a simple blockout of your hair textures in Photoshop. This will serve as your visual reference throughout the creation process.
Texture Variations Needed:
- Ensure diversity in your textures to mimic natural hair:
- 2 Thick Textures: For the main volume of the hair.
- 2 Medium Textures: Useful for general coverage.
- 2 Thin Textures: For finer details.
- 2-3 Flyaway Textures: To add randomness and realism.
- 2 Transition Zone Textures: For areas where the hair density changes, like the hairline or where the scalp meets the hair.
Using 3D Tools:
- Maya with XGen:
- Apply Textures: Import your textured planes into Maya.
- Create XGen Descriptions: Use these to generate the hair fibers on your model, providing a realistic hair simulation.
- Guides and Placement: Although XGen is robust, it can be complex. Using XGen guides to place the cards helps in achieving a more precise and controlled hair layout.
- Fibershop:
- User-Friendly: Fibershop is considered more intuitive and easier to navigate compared to XGen, which might be preferable for those new to hair texturing.
- Workflow Integration: Despite its simplicity, combining Fibershop with XGen guides can enhance your workflow, offering both ease of use and precision in placement.
Workflow Consideration:
- Each tool has its strengths, and depending on your project requirements or personal workflow preferences, you may find one more suitable than the other. Learning how both tools function can provide flexibility and more control over the final look of your character.
By carefully planning your textures and choosing the right software tools, you can create detailed, realistic hair for your 3D models that enhance the overall authenticity and appeal of your characters.
Things that are good to know about XGen (or how not to break yours description)
Before diving into creating an XGen description for your 3D project, setting up your project correctly is crucial to ensure a smooth workflow. Here’s a step-by-step guide to properly prepare for working with XGen in Maya:
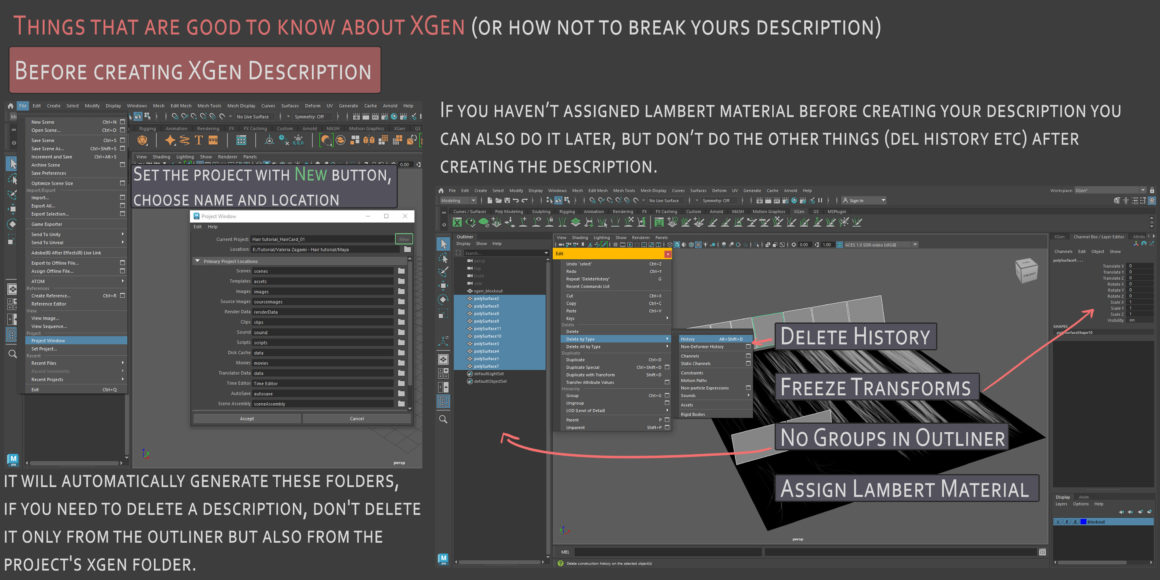
- Set Up the Project:
- Initialize New Project: Click the ‘New’ button, choose a name for your project, and select a location to save it. This action will automatically generate necessary folders for XGen.
- Manage Descriptions: If you need to delete an XGen description, ensure you remove it not just from the Maya Outliner but also from the project’s XGen directory to avoid orphan files that could cause issues later.
- Prepare Your Model:
- Delete History: To prevent past transformations from affecting your current work, clear the history of your model.
- Freeze Transforms: This step stabilizes your model’s transformations and avoids any unintended modifications when applying new deformations or animations.
- Organize Outliner: Ensure no groups are cluttering your Outliner, as this can simplify managing your scene.
- Assign Lambert Material: Applying a simple Lambert material can help in visualizing the hair better without the distractions of complex shading or texturing.
- Additional Tips:
- Material Assignment Flexibility: While it’s optimal to assign a Lambert material before creating your XGen description, you can still do this afterward if necessary. However, the operations like deleting history and freezing transforms should ideally be done beforehand to prevent potential complications with your XGen setup.
By following these preparation steps, you ensure that your project is clean, organized, and ready for creating detailed and dynamic hair or fur with XGen, thus avoiding common pitfalls that could disrupt your creative process.
Creating a Description
When setting up a hair or fur description using XGen in Maya, it’s important to follow a structured approach to ensure that everything functions smoothly. Here’s a detailed step-by-step guide for creating and managing your XGen description effectively:
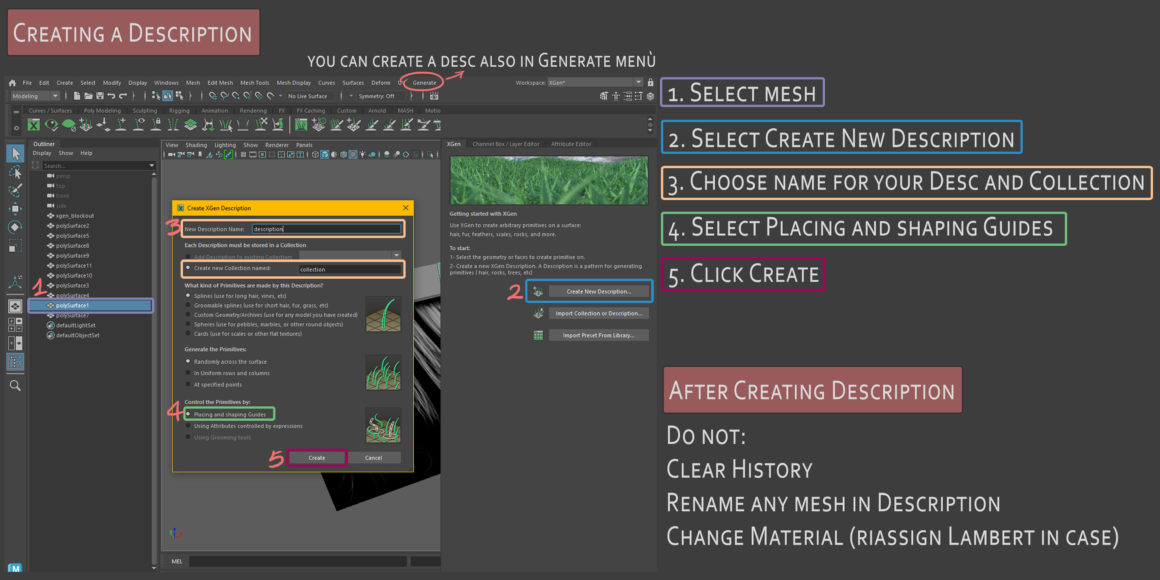
Initial Setup
- Select the Mesh:
- Begin by selecting the mesh where you want to apply the hair or fur.
- Create New Description:
- Navigate to
XGen>Create Description.... This will open a new dialog box.
- Navigate to
- Naming Your Description and Collection:
- Enter a name for your description and the collection it will belong to. Collections help organize multiple descriptions.
- Choose Guide Placement Method:
- Select “Placing and Shaping Guides” as your method. This allows you to manually place and adjust guides on your mesh, which dictate how the hair or fur will flow and behave.
- Create the Description:
- Click
Createto finalize the setup. This action will generate the XGen description based on your settings.
- Click
Post-Creation Guidelines
After creating your XGen description, there are several critical points to keep in mind to maintain the integrity of your XGen setup:
- Do Not Clear History:
- Avoid clearing the history of the mesh after the XGen description has been created. Doing so can disrupt the connection between the mesh and the XGen primitives.
- Do Not Rename Any Mesh in the Description:
- Renaming meshes that are part of the XGen description can cause errors, as XGen tracks objects based on their names.
- Handle Material Changes Carefully:
- If you need to change the material, reassign a Lambert material if necessary. Lambert materials are typically used because they do not interfere with the visibility of the guides and hairs.
Adhering to these steps and precautions will help ensure that your XGen descriptions are set up correctly and remain stable throughout your project, allowing you to focus on the creative aspects of grooming.
Collection and Description
When managing hair in XGen within Maya, there are several key adjustments and settings to consider for optimal control and realism. Here’s how to adjust visibility, control the number of primitives, manage hair curvature, and effectively use modifiers:
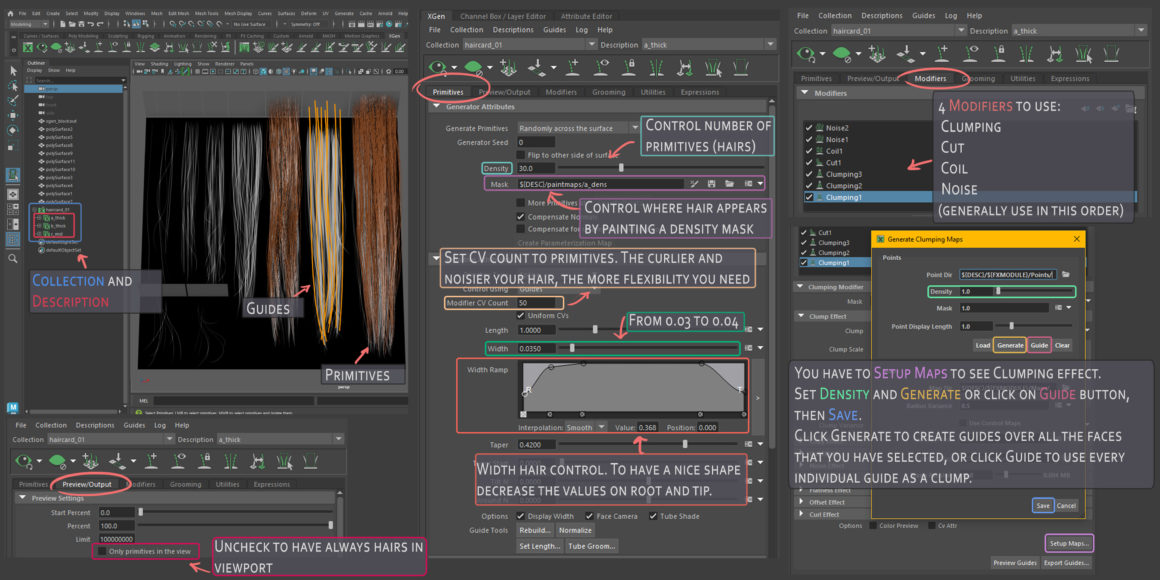
Adjusting Hair Visibility in the Viewport
- Uncheck ‘Always Show Hairs’: In the XGen window, you may find an option to always display hairs in the viewport. Unchecking this can improve viewport performance, especially with complex scenes.
Controlling Hair Density and Quality
- Control Number of Primitives: Adjust the number of primitives (hairs) to balance between realism and performance.
- Set CV Count for Primitives: The Control Vertex (CV) count affects the flexibility of the hairs. Increase the CV count for curlier and noisier hairstyles to allow more flexibility and realistic motion.
Managing Hair Width
- Adjust Hair Width: To achieve a natural tapering effect from root to tip, decrease the width values at the root and tip. Typical values range from 0.03 to 0.04 depending on the look you are aiming for.
Applying Modifiers
To enhance the realism and styling of the hair, apply these modifiers in the following order:
- Clumping: Groups hairs together to form natural-looking clumps.
- Cut: Trims the hair to various lengths to add unevenness and realism.
- Coil: Adds curls or twists to the hair strands.
- Noise: Introduces randomness in the hair direction and length for a more organic look.
Setting Up Maps and Generating Guides
- Setup Maps for Clumping: To visualize the clumping effect, you must first set up texture maps that define how clumps should appear.
- Set Density and Generate Guides:
- Adjust the density slider to define how thick the hair coverage will be.
- Click on ‘Generate’ to create guides over all selected faces, or ‘Guide’ to use each selected guide as the basis for a clump.
- Save Changes: Always remember to save your settings after making changes to ensure that your work is not lost.
By following these detailed steps, you can achieve a highly customizable and realistic hair setup in XGen, allowing for creative and professional grooming results.
GS CurveTools
When working with XGen or similar tools in 3D modeling software to create hair cards for characters, following a structured workflow is essential to ensure efficient and effective results. Here’s a simplified workflow example for creating and manipulating hair cards:
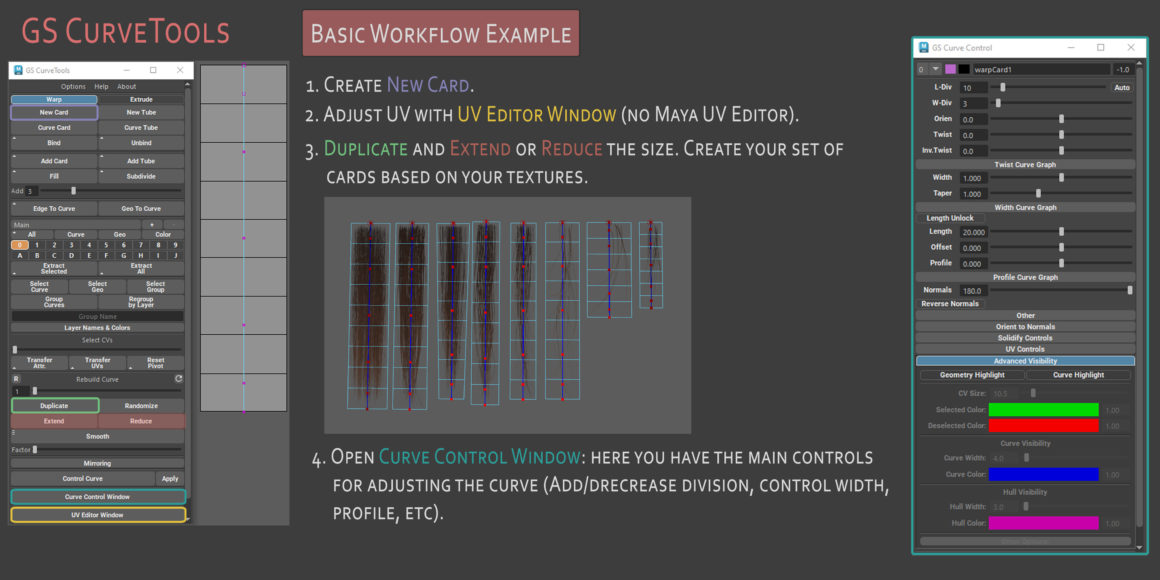
Basic Workflow for Creating Hair Cards
- Create New Card:
- Start by creating a new hair card. This will serve as your base for applying textures and shaping the hair.
- Adjust UVs:
- Open the UV Editor Window to adjust the UV mapping of the hair card. This step is crucial for properly aligning the hair textures on the card. Ensure not to use the Maya UV Editor if specified not to do so by the tool or workflow requirements.
- Duplicate and Adjust Size:
- Once the UVs are set, duplicate the hair card as needed for your character’s hairstyle.
- Modify the size of each duplicated card to vary the hair length and volume. Extend or reduce the size based on the hair style you are creating.
- Organize these into a set of cards that corresponds with your different hair textures and the areas of the head they will cover.
- Utilize the Curve Control Window:
- Open the Curve Control Window to fine-tune the curves on each hair card.
- In this window, you can add or decrease divisions to control the flexibility and flow of the hair.
- Adjust the width and profile settings to match the natural variation in human hair, ensuring some cards are thicker or thinner than others to mimic real hair diversity.
Additional Tips
- Layering and Arranging Cards: When placing the cards on the model, layer them in a way that creates a natural hair volume and direction. Start from the bottom layers near the neck and work your way up to the top of the scalp.
- Testing and Refining: Regularly render tests to check how the hair appears with different lighting and from various angles. This will help identify any adjustments needed in the placement, texture alignment, or card curvature.
- Integration with Other Tools: Depending on your project, you may need to integrate these hair cards with other grooming tools or simulations within your 3D software to achieve dynamic and realistic hair movement.
By following these steps, you can effectively create detailed and realistic hair for characters using hair cards, enhancing the overall visual quality of your 3D models.
Procedural Braid
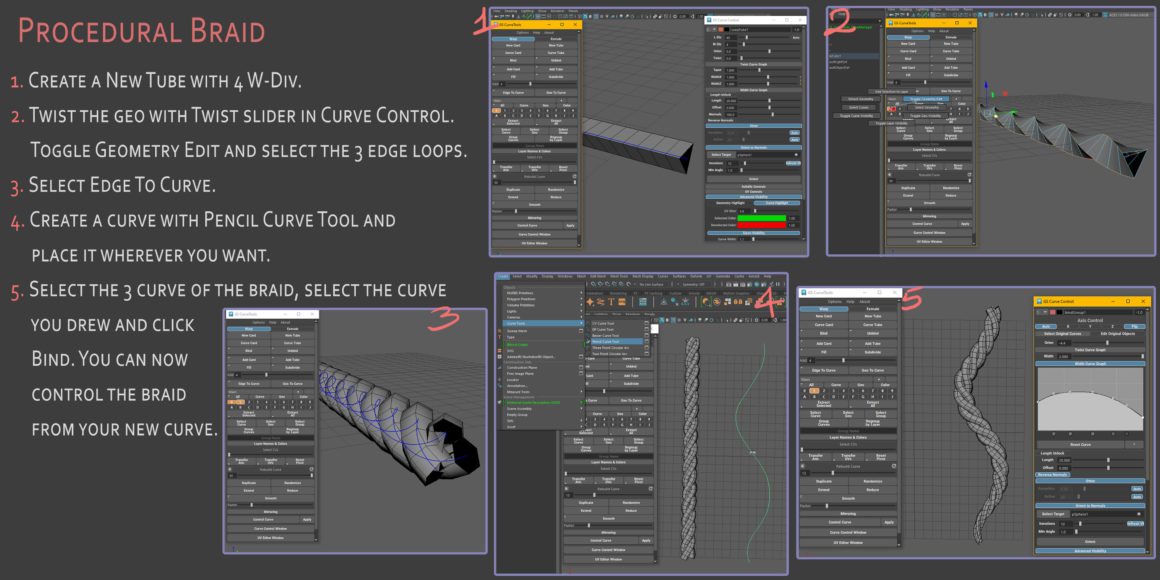
Creating a procedural braid in 3D modeling software involves a series of steps that allow for customizable and dynamic adjustments to the braid’s form and flow. Here’s a detailed guide on how to create a procedural braid using curve and geometry tools:
Procedural Braid Creation Workflow
- Create a New Tube:
- Start by creating a new tube geometry in your 3D software. Set the
W-Divisions(Width Divisions) to 4. This sets up the basic structure of your braid with sufficient geometry to allow for detailed manipulation.
- Start by creating a new tube geometry in your 3D software. Set the
- Twist the Geometry:
- Use the
Twistslider found in the Curve Control panel to twist the tube geometry. This starts to give the circular, intertwined look typical of a braid. - Toggle
Geometry Editmode and select the three edge loops that will form the core of the braid. These loops will be central to defining the braid’s twists.
- Use the
- Convert Edge to Curve:
- Select the twisted edge loops and apply the
Edge To Curvefunction. This converts the selected edges into curve paths that will guide the braid’s form.
- Select the twisted edge loops and apply the
- Draw a Placement Curve:
- Use the
Pencil Curve Toolto create a new curve. This curve will define the path along which the braid will flow. - Position this curve precisely where you want the braid to be on your model.
- Use the
- Bind the Braid to the Curve:
- Select the three curves derived from the braid’s twisted geometry, then select the placement curve you just drew.
- Click
Bindto attach the braid geometry to the placement curve. This binding step is crucial as it allows the braid to follow the drawn curve, ensuring that it conforms to your desired path and shape.
Additional Customization
- Control the Braid: Now that the braid is bound to the curve, you can manipulate the curve to adjust the braid’s position and form dynamically. This is helpful for fitting the braid to different character poses or adjusting its style.
- Further Refinements: You might want to refine the braid by adjusting the thickness, adding hair strands, or further twisting. Each of these steps can be controlled via the Curve Control settings or additional modifiers.
- Texture and Material: Once the braid’s geometry is finalized, apply textures and materials to give it a realistic appearance. Hair textures can significantly enhance the look of the braid, making it blend seamlessly with other hair parts.
This workflow allows for a highly customizable braid that can be adapted to various artistic needs and styles, providing a procedural method to incorporate complex hair designs into 3D characters.
Workflow from XGen to Hair Cards
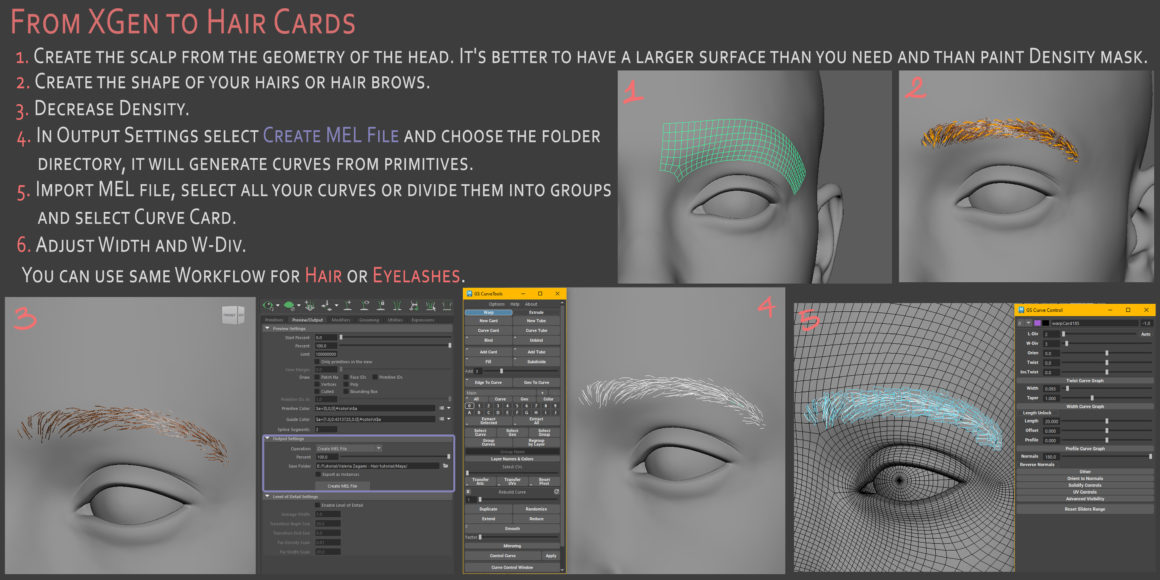
When converting XGen hair to hair cards—a common technique in game development for optimizing character models—following a structured workflow is essential for achieving good results. Here’s a step-by-step guide on how to convert XGen hair or eyelashes into efficient hair cards:
- Create Scalp Geometry:
- Begin by creating the scalp geometry from the head of your character model. It’s beneficial to have a larger surface area than necessary as this gives more flexibility for hair placement.
- Shape the Hair:
- Define the shape of the hair or eyebrows directly in XGen. This involves setting up the initial hair guides and adjusting their length, curliness, and other properties to match your desired hairstyle.
- Adjust Density:
- Decrease the density of the hair in XGen to simplify the transition to hair cards. This step is crucial for ensuring that the hair doesn’t become too heavy or overly complex when converted into geometry.
- Generate Curves with Output Settings:
- Go to the Output Settings in XGen and select “Create MEL File.” Choose a directory for the file. This action will generate curves from the XGen primitives, essentially capturing the hair flow you’ve created.
- Import and Organize Curves:
- Import the generated MEL file into your 3D software. Select all the curves or divide them into groups depending on how you plan to organize the hair cards (e.g., by hair sections like top, sides, back).
- Select “Curve Card” to convert these curves into hair cards.
- Adjust Hair Card Geometry:
- Modify the width and W-Divisions (width divisions) of each hair card to tailor the thickness and detail level to the needs of your project. These adjustments help in fine-tuning the look of the hair cards to ensure they blend well with the character’s head.
Additional Tips for Eyelashes and Hair
- Workflow Flexibility: This same workflow applies whether you are creating hair, eyebrows, or eyelashes. The principles of managing curve density and geometry conversion are consistent across different types of hair.
- Texture Application: After creating the hair cards, applying textures will bring them to life. Use hair textures that closely match the original XGen hair for a seamless transition.
- Optimization: Since hair cards are less processor-intensive than full 3D hair, this method is particularly useful for game characters, where performance is key. Ensure that the number of hair cards and their complexity are balanced against the visual fidelity you aim to achieve.
This workflow from XGen to hair cards provides a streamlined method for translating detailed hair simulations into game-ready formats, optimizing both the artistic quality and technical performance of character models.
Join our community & Get inspired by TOP artists:
Most popular Groom references
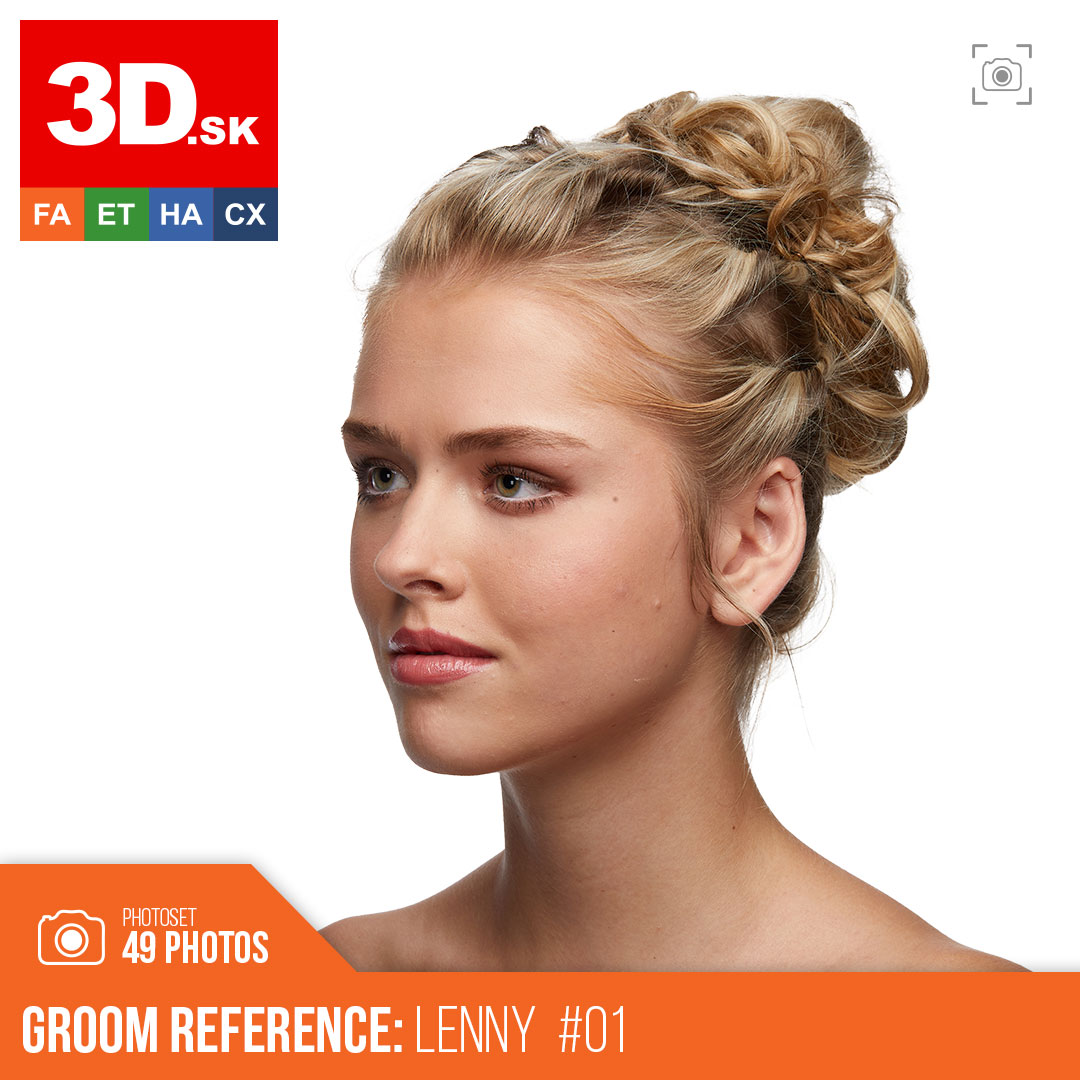


Read more about groom references or visit our website:
Explore GROOM category


